USB Ubuntu: Want to create a bootable Ubuntu USB with persistence? This tutorial shows you how to make a persistent Ubuntu Live USB so your files, settings, and installed applications remain saved between reboots. You'll also learn how to boot Ubuntu from USB and install it to your computer.
Make a Portable Ubuntu Bootable USB

- Official Site: Ubuntu Project Page
- Developer: Canonical Ltd.
- Persistence Support: Yes
What You'll Need
- Ubuntu ISO file
- USB flash drive (16GB or larger recommended)
- YUMI, Etcher, or DD
Verify Your Ubuntu ISO (Recommended)
After downloading Ubuntu, verify the integrity of the ISO by checking its SHA256 checksum:
sha256sum ubuntu.isoCompare the resulting hash with the checksum published on the official Ubuntu download page.
Create a Persistent Ubuntu USB with YUMI
YUMI is one of the easiest ways to create a bootable Ubuntu USB drive with persistence support from Windows. Linux users can also run it through WINE.
- Download and launch YUMI.
- Select your USB flash drive and tick the box to prepare it.
- Choose Ubuntu from the dropdown distribution list.
- Browse to your Ubuntu ISO file.
- Enable persistence and choose the storage size.
- Click Create and wait for the process to finish.
- Restart your computer and boot from the USB device.

Persistence allows Ubuntu to remember saved files, installed applications, browser bookmarks, and system settings between reboots.
Create an Ubuntu USB with Etcher
Balena Etcher provides a simple way to flash Ubuntu to a USB drive, though persistence is not enabled automatically.
- Download Etcher.
- Insert your USB flash drive.
- Download the Ubuntu ISO.
- Launch Etcher.
- Select the Ubuntu ISO.
- Select your USB drive.
- Click Flash!

Adding Persistence to an Etcher USB (Optional)
To save files and settings on an Etcher-created Ubuntu USB, you may need to create a separate persistence partition. The correct label depends on the Ubuntu release: Ubuntu 20.04 and newer use writable, while older releases may use casper-rw. Persistence behavior also depends on the image and boot configuration, so test it before relying on it.
- Create a second partition in unallocated space. For Ubuntu 20.04 and newer, label it
writable; older releases may usecasper-rw. - Format the partition as ext4.
- Boot Ubuntu and test persistence. Depending on the Ubuntu release and boot configuration, you may need to add the
persistentboot option. Save a test file, reboot, and confirm it remains before relying on this setup.
Learn more about the older casper-rw persistence method.
Note: This method requires familiarity with partitioning tools and Linux boot configuration.
Create a Persistent Ubuntu USB with DD
If you prefer command-line tools, you can create a bootable Ubuntu USB using dd and then attempt to add persistence storage. This method is intended for advanced users. Warning: dd overwrites the selected target device. Confirm the USB device name with lsblk and back up its contents before continuing; choosing the wrong device can destroy data on another drive.
Warning: DD performs a raw write and will completely overwrite the selected USB drive.
Using DD on Linux
- Identify your USB device:
lsblkLocate your USB drive (for example
/dev/sdX). - Write the Ubuntu ISO:
sudo dd if=ubuntu.iso of=/dev/sdX bs=4M status=progress oflag=syncReplace
/dev/sdXwith the device path of your USB drive. For example,/dev/sdb.
Wait for the write process to complete. - Verify the resulting partition layout:
lsblk /dev/sdXSome Ubuntu hybrid ISOs leave unallocated space on a larger USB drive after the image is written. If free space is available and the partition layout permits it, create a separate persistence partition. For Ubuntu 20.04 and newer, use the label
writable; older releases may usecasper-rw. Do not alter or format the ISO's existing partitions. - Create a persistence partition using the remaining free space:
sudo fdisk /dev/sdXUse the
ncommand to create a new partition using the remaining unallocated space, then usewto write the changes and exit. - Format the persistence partition:
sudo mkfs.ext4 -L writable /dev/sdXNReplace
/dev/sdXwith your USB device andNwith the number of the new persistence partition. Verify the exact partition withlsblkbefore formatting; for example,/dev/sdb3. The formatting command erases the selected partition. - Boot and test Ubuntu: Restart from the USB drive. Persistence may require the
persistentboot option as well as the correct partition label; the required setup depends on the Ubuntu release and boot configuration. Save a test file, reboot, and confirm it remains before relying on persistence.
Note: Do not assume that a correctly labeled partition will automatically enable persistence. Ubuntu 20.04 and newer use the label writable in documented persistent-live setups; older releases may use casper-rw. Depending on how the USB was created, you may also need to add the persistent boot parameter to the live boot entry. Verify the behavior with your specific Ubuntu ISO.
Using dd for Windows
This method performs a raw write of the ISO to the USB device and is only recommended for advanced users.
Warning: This process will wipe the entire selected disk including any partitions clean.
- Download dd for Windows.
- Insert the USB flash drive.
- Open Command Prompt with administrator privileges
Press Win + R, typecmd, then press Ctrl + Shift + Enter. - Change to the dd directory
Switch to the folder that containsdd.exe:cd c:\path\dd.exe - Clear the USB drive using diskpart
Launch the disk partitioning utility:diskpartShow all attached disks:
list diskSelect the USB drive (replacing #):
select disk #Erase all partition information on the disk:
cleanExit diskpart:
exit - Write the Ubuntu ISO file to USB
Immediately after cleaning the disk, write the image to the device. Replacepathto-ubuntu.isoandXwith the correct USB disk number found in step 5.dd if=pathto-ubuntu.iso of=\\.\PhysicalDriveX bs=4M --progress
Boot from the Ubuntu USB
- Insert the USB drive and restart your computer.
- Open the boot menu or BIOS using keys such as F2, F12, ESC, or DEL.
- Select the USB device as the boot option.
Need help entering BIOS or boot menus?
Install Ubuntu from the USB Drive
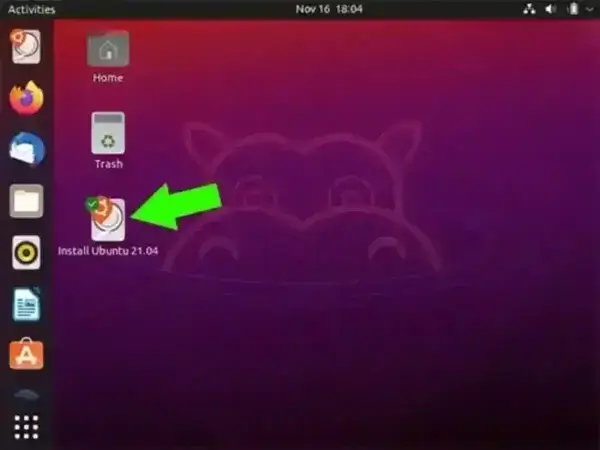
After booting into the live environment, click the Install Ubuntu icon on the desktop and follow the installation prompts.
Frequently Asked Questions
Can I save files and settings on an Ubuntu Live USB?
Yes. Persistence support allows Ubuntu to retain saved files, installed applications, browser bookmarks, and system settings between reboots.
Does Etcher support Ubuntu persistence automatically?
No. Etcher writes the Ubuntu image but does not configure persistence. A separate persistence partition may be needed, with the correct label for the Ubuntu release (writable for Ubuntu 20.04 and newer; casper-rw for some older releases). Depending on the image and boot configuration, the persistent boot option may also be required.
Does DD create persistence automatically?
No. dd writes the Ubuntu ISO to the USB drive but does not configure persistence by itself. A compatible persistence partition and, depending on the Ubuntu release and boot configuration, the persistent boot option may be required. Ubuntu 20.04 and newer use the label writable in documented setups; older releases may use casper-rw.
What size USB drive should I use?
A 16GB USB drive is recommended. Larger drives provide additional space for persistence storage and installed applications.
Can I use DD for Windows?
Yes. DD for Windows can perform a raw write of the Ubuntu ISO to a USB drive. However, persistence must still be added manually afterward.
Final Thoughts
A persistent Ubuntu USB drive is useful for testing Linux, carrying a portable workspace, or troubleshooting systems without installing anything to a hard drive. YUMI provides one of the easiest setup methods for Windows users, while DD and Etcher offer additional flexibility for advanced users who prefer manual configuration.
For most users seeking a persistent Ubuntu USB, YUMI remains the simplest and most reliable solution.