
Create a Bootable StartOS (YlmF OS) USB Drive on Windows, Linux, or macOS. Formerly known as YlmF OS, this tiny Linux distribution is modeled to look and feel like Microsoft Windows. Often described as the Linux that looks like Windows, it combines the visual familiarity of Windows with the performance, security, and freedom of open source software.
In this guide, you’ll learn how to create a Windows-like Linux Live USB. Whether you're using Windows, Linux, or macOS, this tutorial walks you through the process step by step. You can also configure your USB to support persistence, which allows you to save files, system settings, and installed applications across reboots.
Why Create a StartOS Live USB?
- Run a portable Linux OS from a USB stick
- Try Linux without modifying your hard drive
- Carry your customized system with persistent storage

Quick Overview of StartOS
- Project Website: Official Project Page
- Archived Info: YlmF OS Project (Archive)
- Persistence Support: Yes
What You’ll Need
- A USB flash drive (4GB or larger recommended)
- StartOS ISO image
- Access to a computer running Windows, Linux, or macOS
How to Create a StartOS Live USB (Step-by-Step)
Here are five different methods using Universal USB Installer, dd, or Balena Etcher from Windows, Linux or macOS.
⚠️ Warning: Your drive will be wiped clean by all of these methods. Back up anything you want to keep and double check your device path or drive letter before proceeding.
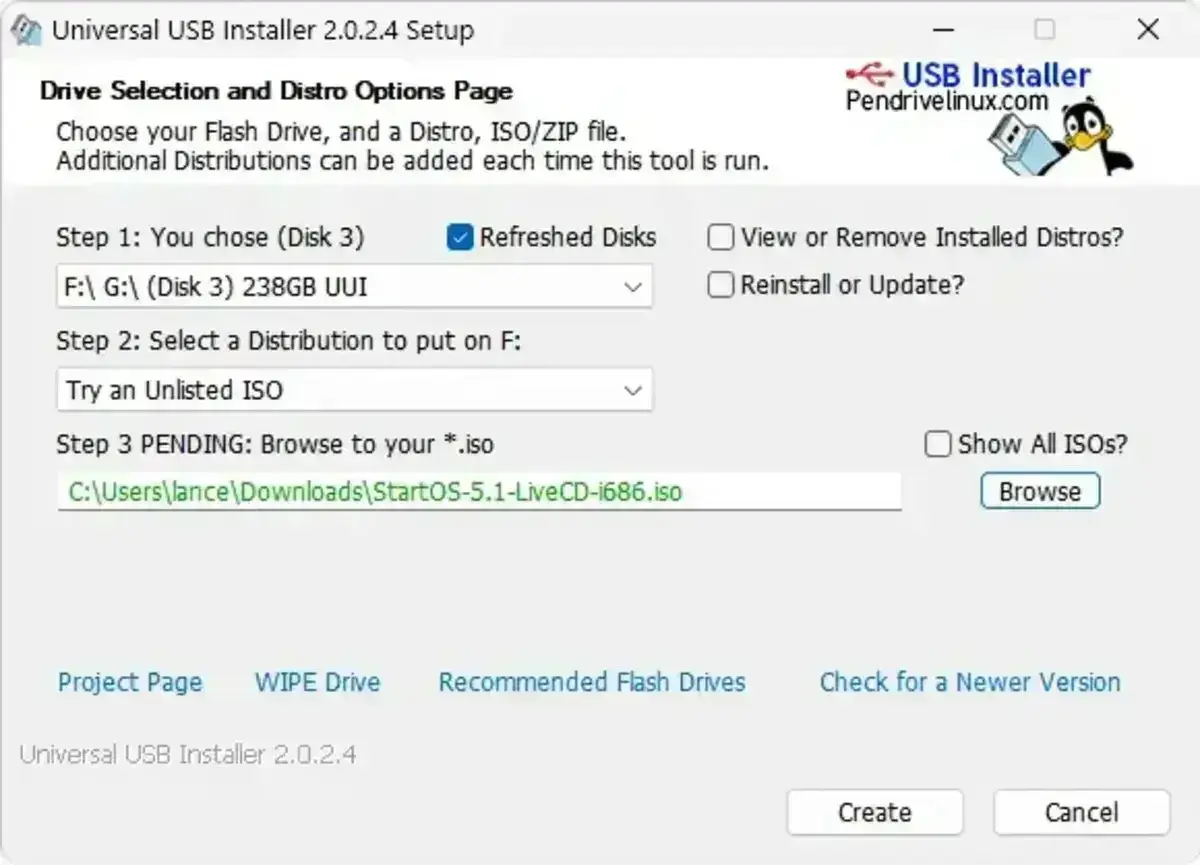
Method 1: Windows (Graphical) – Universal USB Installer
- Download the StartOS ISO.
- Download and launch the Universal USB Installer.
- From the UUI installer:
- Select your USB drive and check the format option.
- Select "Try Unlisted ISO/IMG" as the distribution type.
Pro Tip: You can also choose "Ubuntu" and check "Show All ISOs" to enable persistence options. - Browse to and select the ISO file.
- (Optional) Allocate space for persistence.
- Click Create and wait for the process to complete.
- Reboot your PC and use the BIOS or boot menu to boot from USB.
Method 2: Windows (Command Line) – dd for Windows
- Download dd for Windows.
- Place
dd.exeand the ISO in the same folder. - Open Command Prompt as Administrator.
- Navigate to the folder containing
dd.exe. - Identify your USB drive letter (e.g.,
E:). - Run the following command:
dd if=StartOS-5.1-LiveCD-i686.iso of=\\.\E: bs=4M- Safely eject the USB drive and reboot into the Live environment.
Method 3: Linux (Command Line) – Using dd
This method is simple and works well, but does not support persistence unless you set it up separately.
- Plug in your USB drive and list devices:
lsblk- Identify your USB device (e.g.,
/dev/sdX). - Use
ddto write the ISO image:
sudo dd if=StartOS-5.1-LiveCD-i686.iso of=/dev/sdX bs=4M status=progress oflag=sync- Replace
/dev/sdXwith your actual USB path. - Safely eject and boot from the USB.
Method 4: Linux (Graphical) – Balena Etcher
- Install Balena Etcher.
- Open the app and select the StartOS ISO file.
- Choose your USB drive as the target.
- Click Flash and wait for the write to finish.
Method 5: macOS (Command Line) – Using dd
- Insert your USB drive and list connected disks:
diskutil list- Unmount the disk (replace
Nwith your disk number):
diskutil unmountDisk /dev/diskN- Write the ISO using raw disk access:
sudo dd if=~/Downloads/StartOS-5.1-LiveCD-i686.iso of=/dev/rdiskN bs=4m- Once complete, eject the drive:
diskutil eject /dev/diskN- Boot your Mac or PC from the USB drive.
Note: You can also use Balena Etcher on macOS for a graphical approach.
Final Thoughts
You’ve now created a Live USB for StartOS from your platform of choice. Whether you're using Windows, Linux, or macOS, this bootable flash drive lets you run a fast, familiar Linux OS on nearly any PC. Great for troubleshooting, privacy, learning Linux, or just carrying a full portable Live Linux that resembles Windows in your pocket.
Looking for more lightweight distros? Explore Slax, Puppy Linux, or SliTaz for ultra portable Linux alternatives.