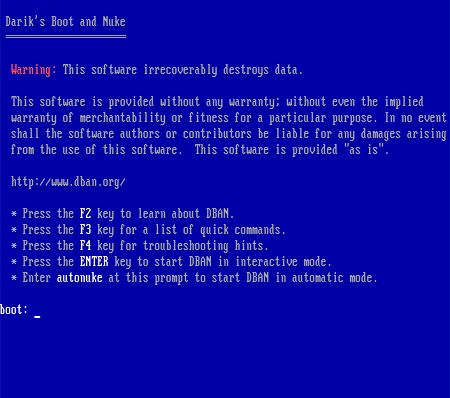
Create a DBAN bootable USB flash drive containing a secure disk erasure tool using the YUMI Multiboot USB Creator. This tutorial covers how to run Darik’s Boot and Nuke from a USB stick using Windows, Linux, or macOS. The utility is designed to thoroughly wipe traditional hard drives (HDDs) through multiple overwrite passes, ensuring permanent data destruction.
Follow along to install, boot, and run this reliable drive wiping solution from a flash drive.
DBAN - Run a Secure Data Wipe from USB

Note: DBAN is ideal for HDDs, but not recommended for SSDs, which require firmware-level secure erase utilities.
- Official Website: Project Page
- Developer: Darik Horn
- First Released: 2002
- Persistence Support: No (not needed)
About DBAN
DBAN (Darik’s Boot and Nuke) is a self-contained, bootable utility for securely erasing data from traditional hard drives. It uses multiple overwrite patterns to ensure permanent data removal.
- Complete Data Removal: Overwrites drive contents using DoD Short, DoD 5220.22-M, Gutmann, and other methods.
- Portable: Runs directly from a USB flash drive.
- Open Source: Free to use, review, and redistribute.
Note: This tool is not suitable for SSDs due to their architecture. For SSDs, use manufacturer utilities like Samsung Magician or Intel Toolbox.
What You’ll Need
- DBAN ISO image
- USB flash drive (8 GB+ recommended) (recommended drives)
- Windows: YUMI Multiboot USB Creator or similar
- Linux: dd command or YUMI (via WINE)
- macOS: dd command (built-in)
Windows Method (YUMI)
- Download the DBAN ISO from the official website.
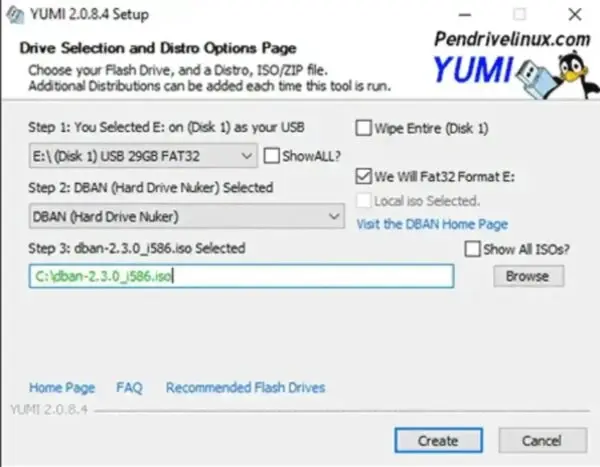
- Launch YUMI Multiboot USB Creator.
- Select your USB drive and choose DBAN from the utility list.
- Browse for the ISO and click Create.
- After completion, reboot and enter BIOS/UEFI to boot from USB.

Linux Method (dd or YUMI)
- Insert USB and locate the device path:
sudo fdisk -l - Unmount the USB:
sudo umount /dev/sdX - Write ISO to USB with dd:
sudo dd if=/path/to/dban.iso of=/dev/sdX bs=4M status=progress - Flush buffers:
sync - Reboot and select USB as the boot device in BIOS/UEFI.
Optionally, YUMI can also be used via WINE for a GUI-based approach.
macOS Method (dd)
- Insert your USB drive.
- Open Terminal and list devices:
diskutil list - Unmount the USB:
diskutil unmountDisk /dev/diskN - Write ISO to USB:
sudo dd if=/path/to/dban.iso of=/dev/rdiskN bs=4m - Flush buffers:
sync - Reboot and select USB as boot device.
Tip: Use rdisk for raw mode to speed up writes.
Booting DBAN and Running a Wipe
- Boot from your prepared USB drive.
- Choose a wiping method: Quick Erase, DoD Short, DoD 5220.22-M, or Gutmann.
- Follow the on screen instructions to securely erase the HDD.
VM Use: Running the tool from a virtual machine might useful for testing the UI without touching real drives. Do not expect actual data erasure.
Tips and Safety
- Data erasure is irreversible—always double-check the target drive.
- Do not attempt to erase SSDs; use manufacturer tools.
- Remove USB after the program loads but before wiping to protect the drive if using
autonuke.
FAQ
How does DBAN work?
It overwrites every sector on the selected hard drive using secure patterns to prevent data recovery.
Can it erase SSDs?
No. SSDs require firmware-level secure erase commands due to wear leveling and hidden blocks.
Is it free?
Yes. DBAN is open source and free to use.
Can I erase external drives?
Yes, as long as the drive is recognized during boot.
Alternative for SSDs or partition management?
Use manufacturer utilities or GParted Live USB for partitioning.
Alternatives to DBAN for Secure Disk Wiping
While DBAN is a well-known and reliable tool for wiping traditional hard drives, there are several other options available depending on your platform and needs. Here are some notable alternatives:
- HDDErase: Free utility that uses the Secure Erase command built into modern ATA drives. Very fast and effective, but Windows-only.
- Parted Magic: Paid Linux-based live environment that supports HDD and SSD secure erase, partitioning, cloning, and benchmarking. Includes a GUI for ease of use.
- GParted Live: Primarily a partitioning tool, but can format and overwrite drives. Great for general disk management and preparing drives for reuse.
- Manufacturer Utilities: Tools like Samsung Magician, Intel SSD Toolbox, and Crucial Storage Executive offer firmware-level secure erase for their SSDs. Essential for proper SSD wiping.
- Linux shred & dd commands: Built-in Linux commands allow you to securely overwrite disks multiple times. Ideal for advanced users comfortable with the command line.
Tip: Always verify your target drive before wiping, and for SSDs, prioritize manufacturer tools or secure erase commands to avoid incomplete erasure due to wear-leveling mechanisms.
Final Thoughts
DBAN remains a trusted solution for securely wiping traditional hard drives, and creating a bootable USB makes the process flexible and portable. Whether you’re preparing a computer for resale, recycling, or simply removing sensitive information, this tool ensures that your data is permanently destroyed and cannot be recovered with conventional methods.
Using Windows, Linux, or macOS, you can choose a method that fits your skill level and comfort: YUMI offers a simple graphical interface for beginners, while the built-in dd command provides full control for advanced users. Mac and Linux users benefit from the raw dd write speed, which can significantly reduce the time it takes to flash the ISO to a USB drive.
Remember that DBAN is designed specifically for HDDs; SSDs require manufacturer-specific utilities due to their internal wear-leveling and hidden storage blocks. Running it in a virtual machine is a safe way to explore its interface and understand the workflow.
Finally, always double check which drive you are targeting before initiating a wipe. Data destruction is permanent and irreversible. With proper precautions, this can be a reliable part of your data security toolkit, giving you confidence that sensitive information is safely removed from your devices.
