How to create a bootable USB Debian Live flash drive from Windows by using Etcher by Balena or the DD command. The following tutorial covers the process of installing Debian to a USB drive from within Windows or Linux. Resulting in a Live bootable USB with optional persistence. Upon completion, you can also use the resulting device to Install Debian from USB to an internal hard drive.
Running Debian Live from a Bootable USB
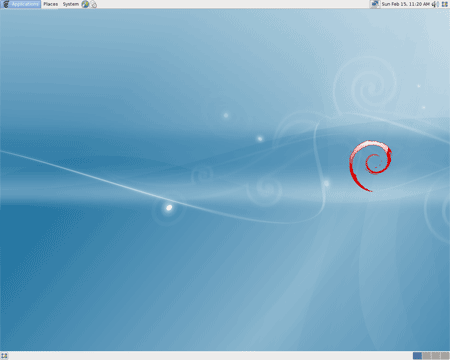
- Etcher: Learn more about Etcher
- Debian Live Website: Official Debian Live Project
- Minimum flash drive capacity: 8GB+
- Persistence Overlay Feature: Yes
Debian Live is a continuing project originally headed by Daniel Baumann. USB-HDD Images based on Gnome, KDE, lxde, Xfce or Cinnamon graphical desktops were once offered. However, this is no longer the case. With hybrid ISO files now available, we can use those instead.
For those of you already up and running from a Linux environment, a custom Debian Live ISO or USB Image can easily be created using the Live-Helper scripts.
Make a Bootable USB Debian Live with Etcher
Note that this install method will create a partition on your flash drive that is the same size as the ISO you use. From Windows, your drive will appear to be missing space, because Windows does not detect the rest of the space which will be utilized for the persistence overlay feature. USB flash drive restoration methods are linked at the end of this tutorial.
Warning: The contents on your flash drive will be wiped clean. Backup anything you want to save before proceeding.
- Insert a 8 GB or larger USB flash drive (for Debian Live with Persistence).
- Grab a Gnome, Xfce, KDE or lxde ISO and save it to your desktop.
- Download Etcher, run the installer to launch the program.
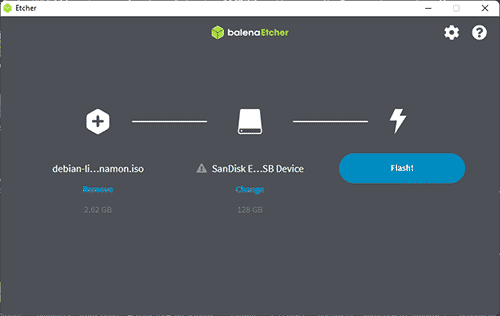
- (1) Browse to and select your Debian-Live .ISO file.
(2) Select your USB flash drive.
(3) Click Flash to burn the ISO to your USB. - A progress bar will indicate the progress of the write. Once it has finished:
(1.) Reboot your PC.
(2.) Enter your BIOS/UEFI using a hotkey during system post.
(3.) Set your Boot Menu to boot from the USB drive, save your changes (F10).
(4.) Proceed to start your computer from the USB flash drive.
If all went well, you should now be booting from your Portable USB Debian Live flash drive. You can also use it to Install Debian from USB to a hard drive.
Create a Debian Live USB using DD
Creating a Debian Live USB installation using the dd command is a straightforward process. You'll need a Debian Live ISO file and a USB drive with sufficient capacity to hold the ISO image. Be very cautious when using the dd command, as it will overwrite any existing data on your storage device. Also be sure to double check the device name to make sure you're writing to the correct device.
Here are steps to make a Bootable Debian USB via the DD command:
- Insert a USB flash drive: Plug a USB drive into your computer. Ensure that you have backed up any important data on the drive, as the following steps will overwrite its contents.
- Download a Debian Live ISO: Go to the official Debian website or a trusted mirror site to download the Debian Live ISO file. Make sure to choose the appropriate version for your architecture (e.g., amd64 for 64-bit systems).
- Locate your USB drive: You need to identify the device name of your USB drive. You can use the
lsblkorfdisk -lcommand to list the available storage devices and identify your USB drive. The device name is usually/dev/sdX, where 'X' is a letter representing the drive. For example,/dev/sdb.fdisk -l - Unmount the USB drive: If the USB drive is automatically mounted when inserted, you'll need to unmount it. You can do this with the following command (replacing
Xwith your actual device):sudo umount /dev/sdX - Write the Debian Live ISO to USB drive: Use the
ddcommand to write the Debian Live ISO to the USB drive. Replace/path_to/debian-live.isowith the actual path to and name of your Debian Live ISO andXwith the actual name of your USB drive:sudo dd if=/path_to/debian-live.iso of=/dev/sdX bs=4M status=progressifstands for the input file (the Debian Live ISO).ofstands for the output file (your USB drive).bs=4Msets the block size to 4 megabytes. This can improve the writing speed.status=progresswill display the progress of theddcommand.
- Wait for dd to finish copying: The
ddcommand will take some time to write the ISO to your USB drive. Be patient and do not interrupt the process. Once it's finished, you'll see a message indicating the number of bytes copied. - Safely eject your USB Debian Live Drive: After the
ddcommand completes successfully, you can safely eject the bootable USB Debian Live flash drive by issuing thesynccommand:sync
Your Debian Live USB installation is now ready. You can boot your computer from this USB drive and follow the on-screen instructions to install Debian or use it as a live system.
Make USB Debian Live Persistent (for saving changes)
Debian ISO files are typically hybrid images, so when the image is extracted to the stick, it does not occupy all of the free space. You can use the remaining space as storage space and or perform the following tasks to create a persistent overlay partition on your bootable USB Debian Live flash drive. This persistence feature allows you to save and restore some of your changes on subsequent boots.
- At the boot screen, tap the E key to edit boot options. Then add the word toram to the end of the linux boot string, and press Ctrl + X to boot.
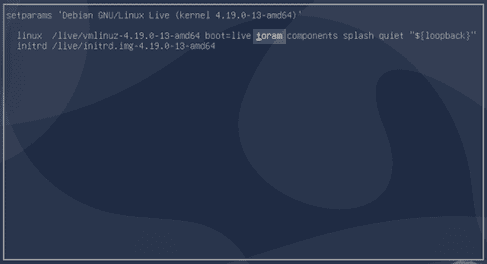
- Once you are up and running, Open a terminal window. I.E. ctrl+alt+x
- Type the following to create a persistent partition.
sudo su(to gain root access)fdisk /dev/sda(assuming your flash drive is sda. Use fdisk -l to check)n(to create a new partition)p(for primary)enter(default to create a 3rd partition)enter(for default first sector as start point)+6G(for 6GB in size)w(to write the changes) - Next, to format the partition as ext3 with a persistence volume label, type the following;
mkfs.ext3 -L persistence /dev/sda3 - Finally, to create a
persistence.conffile with / union so that Debian can detect and use your persistent overlay, type the following;mkdir /ptmp && mount /dev/sda3 /ptmpecho "/ union" > /ptmp/persistence.confumount /dev/sda3 - Once the process has finished, reboot your Debian Live system.
- At the splash boot screen, tap the E key to edit the boot options.
- Add the word persistence to the Linux string and then Ctrl + X to boot.
If all goes well, you should now be booting into your bootable USB Debian Live with persistence. In order to save and restore any changes you make, you need to perform steps 7 and 8 during each boot. Another option is to edit and add a permanent default persistent boot option to your existing boot menu by editing the grub configuration file.
If you would like to return your flash drive to its previous state, you can use this How to restore a USB flash drive tutorial.

