
Creating a Debian Live USB flash drive is the easiest way to try Debian or install it on your internal hard drive without touching your main system. Whether you're on Windows, Linux, or macOS, there are several tools available that make the process simple, including Etcher, YUMI Multiboot, and the dd command. You can also enable persistence to save files and system changes across sessions, turning your USB into a fully portable Debian environment.

How to Make a Debian Live Bootable USB (Persistent)
In this guide, you'll learn how to create a Debian Live USB flash drive that you can boot into or use to install Debian on your internal hard drive. Whether you're on Windows, Linux, or macOS, several tools are available, including YUMI Multiboot, Balena Etcher, and dd. This tutorial also explains how to set up persistence, allowing you to save files and system changes across sessions.

- Project page: Official Debian Live
- Minimum USB size: 8 GB or larger
- Supports Persistence?: Yes
What You'll Need
- A reliable USB stick (8 GB+)
- Debian Live ISO - Download from Debian
- One of the following tools:
- YUMI Multiboot (Windows GUI)
- Etcher (cross platform GUI)
- dd command (advanced; works on Linux/macOS/Windows)
Comparison of Methods
| Tool | Platform | Ease of Use | Supports Persistence | Supports Multiboot |
|---|---|---|---|---|
| Etcher | Windows / Linux / macOS | Beginner friendly | No (ISO only) | No |
| YUMI exFAT | Windows (macOS via Wine) | Intermediate | Yes | Yes |
| dd | Linux / macOS / Windows | Advanced | Yes (manual setup) | No |
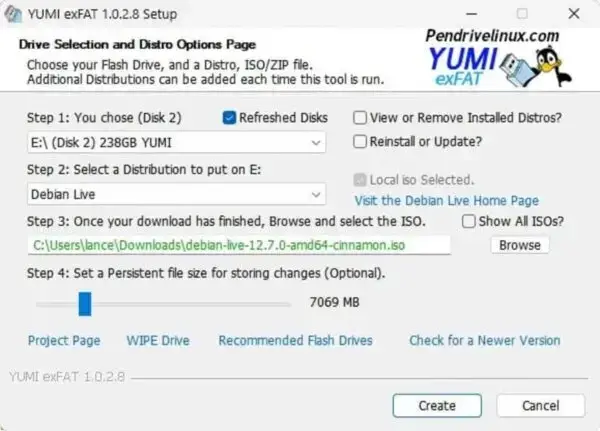
Create a Persistent Debian USB with YUMI
YUMI is ideal for those who want to boot multiple distros from one USB stick. The exFAT version supports persistence for Debian Live.
- Download YUMI exFAT and run it (Windows).
- Select your USB drive.
- Pick Debian Live from the distro dropdown.
- Browse and select your downloaded ISO file.
- Enable Persistence (Optional) and adjust the size as needed (e.g., 4 GB).
- Click Create and wait for the process to complete.
- Safely eject your USB stick.
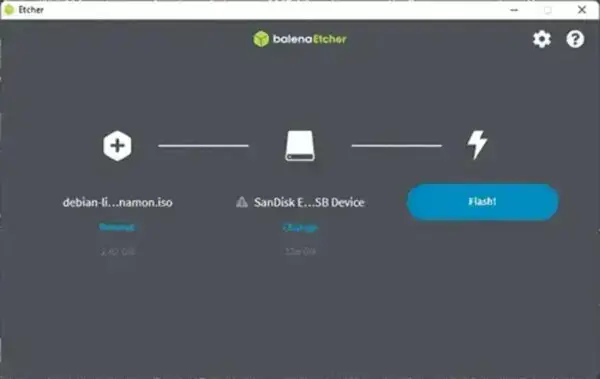
Create Debian Live USB with Etcher
Etcher by Balena is a cross platform graphical utility that burns ISO images to USB drives. It's a great option for beginners.
Note: Etcher will format your USB. Back up any important data before proceeding.
- Insert a USB drive (8 GB or more).
- Download your preferred Debian Live ISO (Gnome, KDE, Xfce, etc.).
- Download and install Etcher (Windows, Linux, or macOS).
- Launch Etcher:
- Select the ISO file.
- Select your USB device.
- Click Flash.
- After flashing, reboot your computer.
- Enter BIOS/UEFI during boot and select your USB as the boot device.
Write a Debian Live ISO to USB using dd
Advanced users can write Debian Live ISOs directly to a USB drive using the dd command. This method is powerful but dangerous if used incorrectly. Always double check device paths, as writing to the wrong disk can erase an entire drive, and we're going to be wiping it clean.
Using dd on Windows
In most cases, I've found that dd can successfully write a Debian Live ISO to the USB drive from Windows after the USB drive has been wiped using diskpart. When the disk is in a raw state, Windows briefly leaves it untouched, allowing dd to write the image.
This short moment, immediately after diskpart clean, is when Windows is effectively hands off and dd has the best chance of succeeding.
- Download dd for Windows.
- Insert your USB drive.
- Launch an elevated Command Prompt
Press Win + R, entercmd, then use Ctrl + Shift + Enter to run it with administrator rights. - Navigate to the dd executable
Change to the directory wheredd.exeis located:cd c:\path-to-dd - Reset the USB device using diskpart
Start the Windows disk partition utility:diskpartDisplay all connected disks:
list diskChoose the USB drive by number (replace # with that of your USB drive):
select disk #Remove all existing partition data from the device:
cleanExit diskpart:
exit - Transfer the Debian Live image to the USB
Immediately after cleaning the disk, write the ISO image. Replacepath-to-debian-live.iso and#with the correct USB disk number.dd if=path-to-debian-live.iso of=\\.\PhysicalDrive# bs=4M --progress
Things to keep in mind:
- The Command Prompt must remain open and elevated
- Do not open Disk Management after running
clean - Do not format or access the USB drive during the write process
- The USB may appear unreadable in Explorer, which is expected
When the write completes, use Windows Safely Remove Hardware to eject the USB drive. Reboot the system, select the USB device from the BIOS or UEFI boot menu, and Debian Live should start.
Using dd on Linux
- Insert the USB and locate the device:
sudo fdisk -l - Unmount the USB drive (replacing sdX with your actual USB device):
sudo umount /dev/sdX - Write the ISO:
sudo dd if=/path/to/debian-live.iso of=/dev/sdX bs=4M status=progress - Flush the write buffer:
sync
Using dd on macOS
- Insert the USB drive.
- Open a Terminal and list devices:
diskutil list - Unmount the USB:
diskutil unmountDisk /dev/diskN - Write the ISO (replace N and path accordingly):
sudo dd if=/path/to/debian-live.iso of=/dev/rdiskN bs=4m - Flush the write buffer:
sync
Debian Live USB Persistence
Replace sdX with your actual USB device which you can find using fdisk -l. It's also assumed that the dd'd ISO file created two partitions already. If that's not the case, edit sdX3 in steps 4 and 5 to reflect the next partition to create.
Manual Partition Persistence
- Boot from the USB and press E at the splash screen. Add
toramto the boot line, then press Ctrl + X. - After booting, open a terminal and gain root access:
sudo su - Create a new partition using
fdisk:fdisk /dev/sdXInside fdisk:
n # New partition p # Primary Enter (accept default) Enter (accept default) +6G # Partition Size w # Write changes - Format and label the new partition as ext4:
mkfs.ext4 -L persistence /dev/sdX3 - Create persistence configuration:
mkdir /ptmp && mount /dev/sdX3 /ptmp echo "/ union" > /ptmp/persistence.conf umount /dev/sdX3 - Reboot. At boot screen, press E, add
persistenceto the boot line, then press Ctrl + X.
Booting Debian Live with Persistence
- Reboot and boot from USB via BIOS/UEFI.
- Choose Debian Live Persistent from the YUMI menu.
- At the boot screen, press E, append the word
persistenceto the Linux line, then press Ctrl + X to boot.
Note: Persistence on recent Debian Live images can sometimes be unreliable as loopback file persistence may not always be detected. In those cases, using a partition labeled persistence with a valid persistence.conf file and the persistence boot parameter generally works best.
Using Larger Persistence Files with UUI or YUMI
Universal USB Installer and YUMI exFAT support Debian Live persistent loopback files stored directly on the exFAT partition of the USB drive. This allows Debian persistence to function while keeping the main storage partition accessible from Windows.
If additional persistent storage space is needed, the default persistence image created by the tool can be replaced with a larger file.
To use a larger persistence image:
- Create a new persistence image file.
- Copy it to the
UUI/Linux-ISOs/directory on the USB drive, replacing the existing persistence file. - Rename the file to match the Debian ISO filename using the
.persistenceextension.
Using Larger Persistence Files (Loopback Method)
Example:
debian-live-13.3.0-amd64-gnome.persistenceThe Debian live boot process associates the persistence image with the ISO filename. As long as the filenames match and the file remains in the correct directory, Debian should automatically attach the persistent storage during boot.
Final Take: Choosing the Right Method for You
- New to Linux? Use Etcher for its simplicity and cross platform support (Windows, Linux, macOS).
- Need multiboot or persistence? YUMI (exFAT) automatic persistence via sparse loopback files (Windows or Linux/macOS via Wine).
- Advanced user? The dd command provides precision and control (Linux/macOS/Windows), but double check device paths.
Restoring Your USB Drive
If you want to repurpose your USB drive for everyday storage after creating a Debian Live system, follow our tutorial to restore your USB flash drive back to its original state.