Easily create a bootable Live KNOPPIX USB flash drive using the Universal USB Installer. KNOPPIX is a free, open-source, Debian-based Live Linux distribution. It's well known for its portability, automatic hardware detection, and usefulness in system recovery, diagnostics, and hardware testing.
Booting KNOPPIX Live from a USB Drive

About KNOPPIX Linux
KNOPPIX allows users to run a full Linux environment from a USB drive, CD, or DVD, no installation required. Originally developed by Klaus Knopper, it's one of the earliest and most reliable live Linux systems. It's ideal for secure browsing, data recovery, system repair, or testing hardware compatibility.
Key Features
- Live OS: Runs directly from USB or optical media with no need to install anything on your hard drive.
- Debian-Based: Built on the stable Debian foundation with access to its extensive software repositories.
- Automatic Hardware Detection: Detects and configures most devices right out of the box.
- Persistence Support: Allows saving files and system changes between sessions (on supported setups).
- Lightweight Desktop: Uses LXDE or KDE for fast performance, even on older machines.
- Portable: Carry a complete Linux system in your pocket.
- "toram" Mode: Loads KNOPPIX into RAM for increased performance during use.
System Requirements
- USB flash drive (4GB minimum; SSD flash drive recommended for speed)
- KNOPPIX ISO file (links below)
- Computer running Windows, macOS, or Linux
KNOPPIX vs Ubuntu Live – Comparison
Both KNOPPIX and Ubuntu Live run directly from a USB stick, but they serve slightly different purposes. Use the table below for a quick comparison and the FAQs for more detailed explanations.
| Feature | KNOPPIX Live | Ubuntu Live |
|---|---|---|
| Primary Use | System recovery, hardware testing, portability | Testing Ubuntu, installing, or temporary live use |
| Size | Smaller footprint, lightweight | Larger ISO (~4GB+), more resource-heavy |
| Desktop Environment | LXDE or KDE (lightweight, fast) | GNOME by default (heavier on older hardware) |
| Persistence | Built-in support (KNOPPIX-DATA overlay) | Possible but requires manual setup (casper-rw) |
| Hardware Detection | Excellent automatic detection | Strong, geared toward modern PCs |
| Best For | Recovery tools, older hardware, portable Linux toolkit | Daily use, trying Ubuntu, or preparing for install |
Creating a KNOPPIX Live USB on Windows
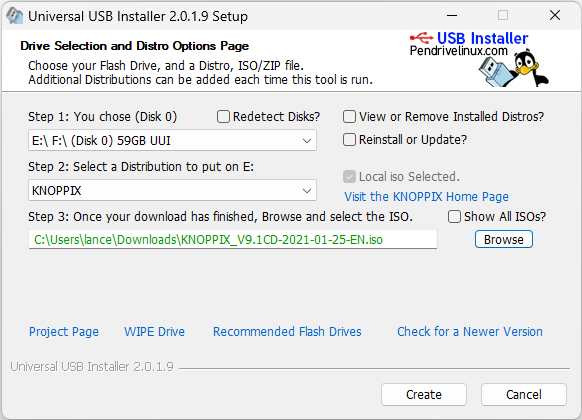
Use the Universal USB Installer (UUI) to prepare your KNOPPIX USB stick:
- Download the Universal USB Installer.
- Get the latest KNOPPIX ISO.
- Run UUI and follow the steps:
- Select your USB device.
- Choose "KNOPPIX" from the distribution list.
- Browse to the ISO file and click Create.

Creating a KNOPPIX USB on Linux
Linux users can use the dd command to write the ISO to a USB device:
- Download the KNOPPIX ISO.
- Open a Terminal window.
- Find your USB drive:
lsblk - Unmount the device (replace
Xwith your actual device letter):sudo umount /dev/sdX1 - Write the ISO to the USB:
cd ~/Downloads
sudo dd if=knoppix*.iso of=/dev/sdX bs=4M status=progress oflag=sync
Creating a KNOPPIX Live USB on macOS
- Download the ISO from the official KNOPPIX site.
- Insert your USB drive and identify the disk:
diskutil list - Unmount it (e.g.
/dev/disk2):diskutil unmountDisk /dev/disk2 - Write the ISO (replace with your actual path and disk):
sudo dd if=~/Downloads/knoppix.iso of=/dev/rdisk2 bs=4m - Once complete:
diskutil eject /dev/disk2
Booting KNOPPIX from USB
- Restart your PC.
- Enter your BIOS/UEFI menu (usually F2, F12, ESC, or DEL during boot).
- Set your USB device as the primary boot option.
- Save and exit. KNOPPIX should now boot from your USB.

Troubleshooting Tip:
If the system doesn't boot, try disabling Secure Boot or enabling Legacy Boot mode in your BIOS settings.
Using KNOPPIX with Persistent Storage
What is KNOPPIX Persistence?
KNOPPIX Persistence allows you to save files, installed programs, browser settings, and other system changes. These are stored on the same USB drive and automatically reloaded during the next boot.
How to Enable Persistence
Some KNOPPIX versions will automatically prompt you to create a persistent overlay file during your first boot (especially DVD-sized builds).
- Choose Yes to create a persistent image.
- Select the size (up to 4GB for FAT32, or larger with ext3/ext4).
- Optionally encrypt the overlay for privacy.
- Let KNOPPIX finish creating the image and reboot when done.
Manual Persistence Setup (Advanced Users)
- Boot using the cheat code:
knoppix myconfig=scan - Create a separate partition or file named
KNOPPIX-DATA. - KNOPPIX will automatically detect and use it to save data.
Persistence Limitations
- FAT32 file systems limit image size to 4GB.
- Not all USB installers support persistence (UUI may need custom tweaks).
- Performance depends on the USB drive speed.
Recommended Boot Option
knoppix toram myconfig=scanKNOPPIX Live USB Creation Methods Compared
| Method | Platform | Persistence Support | Ease of Use |
|---|---|---|---|
| Universal USB Installer | Windows | Limited (manual config) | Beginner-friendly |
| dd Command | Linux/macOS | Yes (manual setup required) | Intermediate |
| Manual Live Build | Linux | Yes (customizable) | Advanced |
Frequently Asked Questions
What is KNOPPIX?
A Debian-based Live Linux operating system that runs directly from a USB stick, CD, or DVD.
Can I save changes with KNOPPIX?
Yes. If persistence is enabled, your files and configurations are saved between sessions.
What is "toram" mode?
It loads the entire system into RAM for faster performance, especially on systems with at least 2–4GB of memory.
Does KNOPPIX work with modern hardware?
Yes, it features robust automatic hardware detection and supports most current components.
What desktop does KNOPPIX use?
LXDE by default; some versions offer KDE.
Is KNOPPIX better than Ubuntu Live?
KNOPPIX is ideal if you want a portable Linux toolkit for data recovery, diagnostics, or running on older machines. It is lightweight, fast, and detects hardware automatically.
Ubuntu Live is better if you want to test Ubuntu, install it as a full OS, or use it on modern PCs. It is more resource-intensive but designed for daily use.
Does KNOPPIX support persistence better than Ubuntu Live?
Yes. KNOPPIX has built-in persistence using a KNOPPIX-DATA overlay, so you can save files and settings easily. Ubuntu Live also supports persistence, but it requires creating a casper-rw file or partition manually.
Which is better for older hardware?
KNOPPIX is better suited for older PCs due to its lightweight LXDE/KDE desktop and small ISO size. Ubuntu Live's GNOME desktop may run slower on older machines.
Can I use Ubuntu Live for recovery and diagnostics like KNOPPIX?
Ubuntu Live can be used for basic recovery or live sessions, but KNOPPIX comes with built-in tools for system diagnostics, data recovery, and hardware testing, making it more convenient for those tasks.
Final Thoughts on Booting KNOPPIX from USB
Booting KNOPPIX from USB drive gives you a powerful, portable Linux system for recovery, diagnostics, or secure computing on any machine. With support for persistence, it can become your personal Linux desktop on the go.
Download and create a KNOPPIX Live USB and take Linux portability to the next level!
