
Creating a USB Bootable RUNT Linux; This walk through illustrates how to install, boot, and run RUNT Linux from a USB flash drive. RUNT is a super super tiny and very basic Linux distro. It is recommended for intermediate to advanced users who prefer to do work without using a graphical interface like X. Beware that by default it does not feature a GUI, it uses a text only based interface.
USB RUNT Linux

- Distribution Home Page: Project Page
- Persistent Feature: Unknown
What is RUNT Linux?
RUNT Linux (ResNet USB Network Tester) is a lightweight, Slackware-based Linux distribution designed to run directly from a USB flash drive. It is primarily used for network testing, troubleshooting, and basic system recovery tasks. This minimal, text-based distribution is perfect for advanced users who prefer working without a graphical interface.
Features:
- Slackware-based, minimal Linux distribution
- Runs directly from a USB flash drive – no installation required
- Uses a text-only interface (no GUI by default)
- Includes essential tools for network diagnostics
- Small enough to fit on very small USB drives
- Can boot via USB or floppy disk for older systems
Requirements:
- USB Flash Drive (128 MB or larger)
- RUNT Linux ZIP file
- A Windows or Linux computer (to make the bootable USB drive)
Steps to Create a Bootable USB for RUNT Linux
Since there is no ISO file, you'll need to follow these steps using the RUNT ZIP archive and included scripts:
- Download the runt-5.0.zip file from the official website.
- Insert your USB flash drive and format it to FAT32.
- Unzip the contents of the zipped file directly onto the USB drive.
After unzipping, your USB drive should have the following structure:
/linux (contains the core RUNT files)
/runtutil (contains utility scripts)
Note: The files inside the /linux folder may appear "mangled" (with strange filenames) until the drive is properly mounted with UMSDOS. Do not modify or delete these files.
- Navigate to the /runtutil folder on the USB drive.
- Run the appropriate script to make the USB drive bootable:
- On Windows: Double-click makeboot.bat.
- On Linux: Open a terminal, navigate to /runtutil, and run:
sudo ./makeboot.sh- If you need a boot floppy for systems that do not support USB booting, use:
- Windows: Run mkfloppy.bat from the /runtutil folder.
- Linux: Run sudo ./mkfloppy.sh in the terminal.
- Once the USB drive is prepared, eject it safely.
- Restart your computer and enter the BIOS or boot menu to set the USB drive as the primary boot device. Save your changes and reboot.
Make a RUNT Bootable USB Flash Drive using UUI
Note: The following method uses an older version of Universal USB Installer. The Newer versions of UUI wont work.
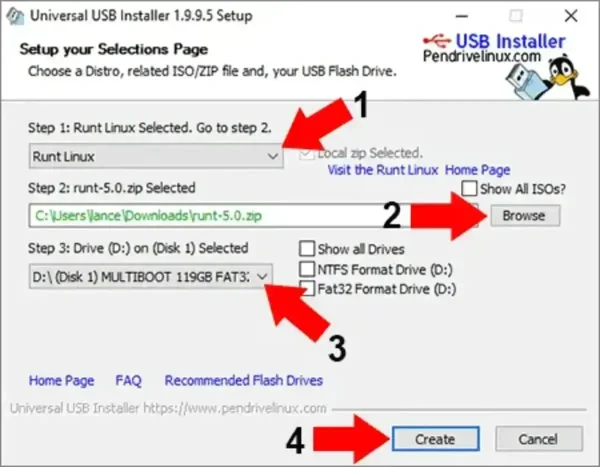
- Download and launch the Universal USB Installer
- 1.) Select Runt Linux from the drop down.
2.) Browse to your .zip file.
3.) Select your Flash Drive.
4.) Click Create.
- Once the Installation has finished, restart your PC and set your BIOS or Boot Menu to boot from the USB device, save your changes and reboot.
Save your BIOS settings. On the next reboot, you should have a successful launch of RUNT Linux.
RUNT Linux: Username and Password
If the setup was successful, RUNT Linux will boot from the USB drive. You can use the following credentials to login:
- Username: root
- Password: (No password set by default)
You can also run the runthelp or diskhelp commands to get started. For network diagnostics and troubleshooting, the pre installed tools will be available via the command line.
Note for Older Systems
If your computer doesn't support booting from USB, you can use the boot floppy created with mkfloppy.bat or mkfloppy.sh to start RUNT Linux from USB.
Important: Be careful when selecting the USB drive during installation, as these scripts modify the boot sector. Double or triple check that you have selected the correct drive.