Make Linux bootable USB drives from ISO files. Easily boot from USB Windows or Pendrive Linux. Multiboot ISO files from one pen drive, thumb drive, jump drive, or flash memory stick. Run Linux on Windows as a VirtualBox (VM) Virtual Machine. Installing Proxmox to create a portable virtual OS environment, and much more.

On this site you'll find simplified tutorials, software, and media creation tools to help you easily create Linux bootable USB drives from ISO files. Make portable Linux Live USB sticks, install or make a bootable USB for Windows 10 or 11, run antivirus programs, backup utilities and system diagnostic tools from a flash memory stick or SD card, perform virtual machine (VM) or kernel-based (KVM) emulation, cloud computing, etc.
Additional information is also provided to help you learn how to enter BIOS and set a computer system to startup and boot from a USB flash drive. Several articles have been created to help you setup, configure, and customize Linux. Along with various tutorials providing Linux shell script commands and coding examples to assist you in making full use of the power of Linux.
How to Make Linux or Windows Bootable USB Drives?
To create Linux or Windows bootable USB flash drives and get up and booting quickly, you can use one of the following Pendrive Linux utilities. Both tools provide a categorized list of example bootable distributions, information on where to download the ISO files, along with links to each corresponding project page. If you are just getting started, we recommend using YUMI exFAT as it supports Multibooting from both BIOS and UEFI systems and is the most frequently updated. It can also be run from within most modern Linux environments using WINE.
YUMI Multiboot USB Boot Creator

Updated: 25 Jan, 2024
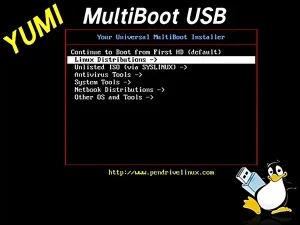
YUMI is multiboot USB bootable software for Windows or Linux. This utility is the successor to the singular Universal Installer. It is a multiboot tool created for the purpose of multibooting. In that it allows you to boot multiple ISO distributions and system diagnostic tools from one multi bootable thumb drive.
Universal USB Installer (UUI) - Bootable Software

Updated: 3 Feb, 2024
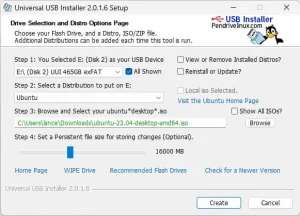
Universal USB Installer (UUI) is a popular USB bootable software for Windows or Live Linux. Created over 15 years ago, it was one of the first automated tools that could make ISO distributions boot from USB. UUI was recently updated to support an exFAT file system for storage + multibooting and now works like YUMI.
Boot and run your favorite operating systems and tools from a USB flash drive. Copy ISO to USB and take your portable operating system with you to run at any computer that can boot from a USB drive. You can also automate the process and boot multiple ISO files from one flash drive or micro sd card by using a multiboot installer media creation tool like YUMI to create a multisystem UFD.
What is a Multiboot USB?
Multibooting allows you to store and run several Linux operating systems, Windows installers, Windows to Go, Windows PE, system diagnostic utilities, antivirus scanners, penetration testing, cloning tools, backup tools, and more, all from the same removable device. Resulting in your own custom personalized bootable diagnostic tool kit that you can put on a keychain or carry in your pocket.
Why Boot from USB?
USB booting has several benefits, including but not limited to:
- OS Portability and Convenience: Flash drives are small and easy to carry around in your pocket, which makes them convenient to use for booting from USB operating systems or system tools — while on the go. For example, you might use one to temporarily boot from a Linux bootable USB, allowing you to run your own portable OS on a computer at a friend's house, while at school, from your work PC, or when traveling.
- USB Boot from Multiple Operating Systems: A variety of operating systems including Windows, Linux, and FreeBSD can be booted and run from a flash drive. Making this a versatile option for troubleshooting, running specialized software, testing out new operating systems, and installing them.
- Boot from USB for Privacy and Security: Can be more secure than booting from the computer's local hard drive because it isolates the operating system and any files on the removable drive from the computer's internal storage. This can be useful if you are working from a computer that you don't trust or if you are worried that you might encounter malware or other security threats.
- Operating System Recovery from USB: If your computer's operating system is corrupted or you're experiencing other issues, you can boot from USB into a recovery environment to perform a fix or install a fresh copy of the operating system.
- Fast Solid State Speed: In some cases, a removable drive can be faster than booting from the computer's internal hard drive, especially if you're using a super fast SSD flash drive and the internal hard drive you are working with is old or slow.
- Cool Factor of USB Booting: The ability to bring your own custom Live portable operating system with you to plug in and run from any computer brings about envy because it's just so satisfying and cool. Once others see what you can boot from USB, they want to do it too!
As you can see, USB booting can be a convenient, versatile, fun, and secure option for a variety of useful tasks.
Helping you Boot from USB since 2006
Since 2006, Pendrive Linux has been providing simplified tutorials, flashdrive bootable software and Windows media creation tools that make booting a computer from a removable UFD, easy. Enabling you to walk up to any available PC, insert a flash drive, do your work, shut down, unplug the removable device and carry on with your day. By default this usually happens while attempting to leave no traces behind on the host computer system that the removable media was booted from.
I would like to extend my personal thanks to all of those who have provided continued support and feedback over the years. It is because of you that the bootable pen drive software, projects, simplified USB Linux, Windows booting from USB tutorials, and related how to boot from USB information provided throughout this website remain accessible to this day.
This site was originally established as a simple means to experiment and share useful information about booting from USB. This was done in hopes that by sharing whilst learning, I might help others who may also be looking to find ways to easily boot and then run their Live ISO files, Windows installers, PE, antivirus scanners, cloning software, and various other useful diagnostic tools - all from a UFD.
~ Lance
Why the Linux Penguin?
 The cartoonlike Penguin (Tux) is historically known as the official Linux Mascot. What better way to represent the portability of running Linux on bootable USB than to have Tux portrayed carrying his flash drive with him! A special thanks goes out to Marcio dos Santos (Aicrom) — the artist who originally created our Pen Drive Tux Mascot.
Fast forward 18+ years later, Pen Drive Tux is still alive and kicking. Continuing the mission to help you easily make bootable USB flash drives, thumb drives, jump drives, and micro sd cards. Live boot from removable storage devices!
