
How to create a Live Lubuntu bootable USB flash drive with persistence. Lubuntu Linux is an official Ubuntu flavor that uses the lightweight LXQt desktop environment. It is designed to run efficiently on older computers, netbooks, and systems with limited RAM or CPU resources.
Lubuntu Live Bootable USB with Persistence

- Distribution Home Page: Lubuntu Home Page
- Base: Ubuntu
- Desktop Environment: LXQt
- First Released: 2009
- Minimum USB Size: 4 GB (8 GB+ recommended for persistence)
- Persistence Support: Yes
In this guide, you will learn how to create a Lubuntu Live USB that can boot on most PCs. Instructions are provided for Windows, Linux and macOS users, with both graphical and command line methods covered. When finished, you will be able to boot Lubuntu directly from USB, optionally saving changes using persistence.
What is Lubuntu?
Lubuntu is a lightweight Linux distribution based on Ubuntu which officially joined the Ubuntu family in 2011. Known for its focus on speed and minimal resource usage, it utilizes the LXQt desktop environment, which is fast, energy efficient, making it great for use on older or less powerful computer hardware, while also performing well on modern or high end systems.
- Best for: Older PCs, netbooks, low end laptops or a super fast desktop on modern systems.
- Memory footprint: Very low
- Software support: Ubuntu repositories
Lubuntu is an excellent choice if you want a responsive Linux desktop without sacrificing compatibility or stability.
What You Need
- Lubuntu ISO file
- USB flash drive (4 GB minimum, 8 GB+ recommended)
- A Windows PC, Linux, or macOS running system
Create a Lubuntu Bootable USB on Windows
The easiest way to create a Lubuntu Live USB with persistence on Windows is by using YUMI.
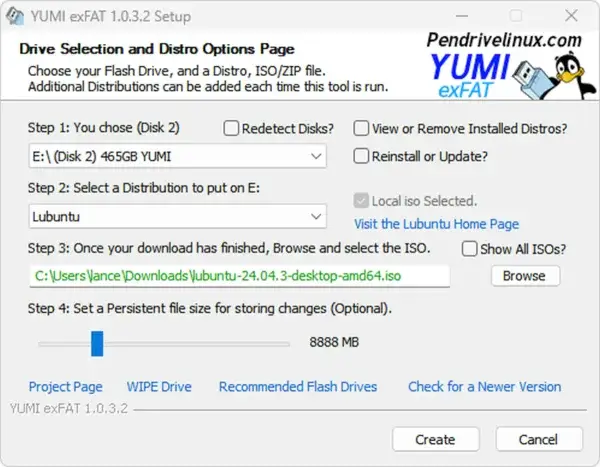
Method 1: Create Lubuntu USB Using YUMI
- Download and run YUMI.
- Select your USB drive.
- Choose Lubuntu from the distribution list.
- Browse to and select the Lubuntu ISO file.
- Optional: Adjust the persistence slider to enable saving changes.
- Click Create and wait for YUMI's completion.
Once finished, reboot your PC, enter the BIOS or Boot Menu, and select the USB device to boot Lubuntu.
Method 2: Create Lubuntu USB Using dd on Windows
Warning: The dd method will overwrite the entire USB drive. Double check the disk number before proceeding.
- Download the Lubuntu ISO from the official site.
- Download dd for Windows
- Insert your USB drive.
- Open an elevated Command Prompt;
Press Win + R, entercmd, then use Ctrl + Shift + Enter to launch it with administrator rights, then type:diskpart
Identify your USB disk number and assigned volume letter:
list disk
Select your USB disk number (replacing
Xwith the actual number):select disk X
Next, to wipe the disk clean and unmount it, then exit
clean
exit
Change directory, cd to the path where you extracted dd.exe;
Write the ISO to USB (replacingpathto-lubuntu.isoandXwith your USB Disk number):dd.exe if=pathto-lubuntu.iso of=\\.\PhysicalDriveX bs=4M --progress
Create a Lubuntu Bootable USB on Linux
Linux users can also create a Lubuntu Live USB directly from the command line using dd. This method is fast and reliable, but it creates a read only hybrid ISO layout. Persistence is not enabled by default and must be added manually afterward.
Method: Create Lubuntu USB Using dd on Linux
Warning: The dd command will completely overwrite the selected USB device. Selecting the wrong disk can destroy data on your system. Double check the device name before proceeding.
- Download the Lubuntu ISO from the official Lubuntu website.
- Insert your USB flash drive.
- Open a terminal and identify the USB device:
lsblk
Look for your USB device, such as
/dev/sdb. Do not use a partition like/dev/sdb1. - Unmount any mounted partitions on the USB drive:
sudo umount /dev/sdX*
Replace
Xwith your actual device letter. - Write the Lubuntu ISO to the USB drive:
sudo dd if=/path/to/lubuntu.iso of=/dev/sdX bs=4M status=progress oflag=sync
Wait for the command to finish. This may take several minutes.
- If you wish, safely eject the USB drive:
sync
Once complete, reboot your computer and select the USB device from the BIOS or UEFI boot menu to start Lubuntu.
Note: A USB created with dd does not include persistence by default. To enable persistence on a dd written Lubuntu USB, you must manually create a writable persistence file or partition and add the appropriate boot parameters. This is an advanced setup and differs from tools like YUMI, which automate persistence creation.
Optional: Enable Persistence on a dd Written Lubuntu USB
When a Lubuntu ISO is written to USB using dd, the drive is created in a read only hybrid ISO format. To enable persistence, you must manually create a writable persistence file or partition and pass the correct boot parameter.
These steps apply to Ubuntu based systems including Lubuntu.
Option 1: Persistence Using a File (Simplest)
This method works well when free space exists after the ISO on the USB drive.
- Boot into any Linux system.
- Insert the Lubuntu USB drive.
- Create a persistence file on the USB device root:
sudo dd if=/dev/zero of=/media/$USER/LUBUNTU/persistence.img bs=1M count=4096
sudo mkfs.ext4 /media/$USER/LUBUNTU/persistence.img
Adjust the size by changing the count value. 4096 equals 4 GB.
- Create a persistence configuration file:
echo "/ union" | sudo tee /media/$USER/LUBUNTU/persistence.conf
Option 2: Persistence Using a Dedicated Partition (More Reliable)
This method is recommended for long term use.
- Use a partitioning tool such as GParted.
- Shrink the existing USB partition to make free space.
- Create a new ext4 partition in the free space.
- Label the new partition exactly:
persistence
- Create the persistence configuration file on that partition:
echo "/ union" | sudo tee /media/$USER/persistence/persistence.conf
Enable Persistence at Boot
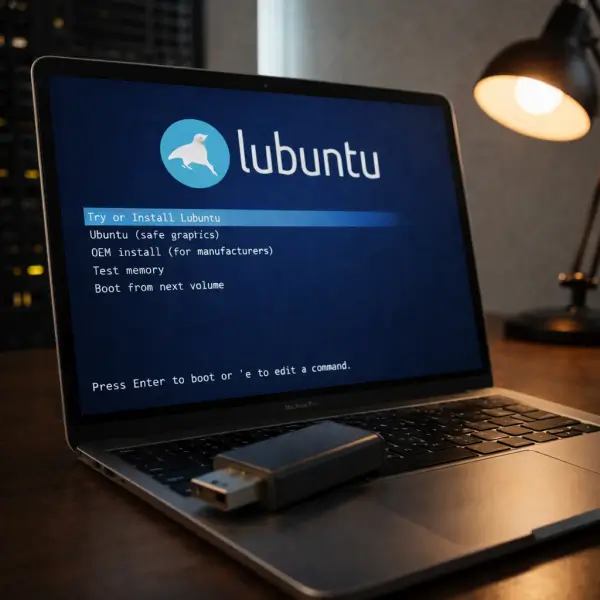
At the Lubuntu boot menu:
- Select the Live entry.
- Press e to edit boot parameters.
- Add the following to the kernel line:
persistent
- Boot using Ctrl + X or F10.
Once enabled, Lubuntu will save system changes, installed packages, and user files across reboots.
Tip: If you want persistence without manual setup, YUMI remains the easiest option on Windows. The dd method is best suited for users who want full control or are working entirely from Linux.
Create a Lubuntu Bootable USB on macOS
macOS can also be used to create a Lubuntu bootable USB. The two recommended methods are Balena Etcher (GUI) and dd (Terminal).
Method 1: Create Lubuntu USB Using Balena Etcher (macOS)
This is the safest and easiest option for most users.
- Download the Lubuntu ISO.
- Download Balena Etcher for macOS.
- Insert your USB drive.
- Open Etcher, select the Lubuntu ISO, choose the USB drive, and click Flash.
Note: Etcher creates a standard live USB. Persistence must be added separately if required.
Method 2: Create Lubuntu USB Using dd on macOS
Advanced users can create a Lubuntu USB using the Terminal.
diskutil list
Identify your USB disk number, then unmount it:
diskutil unmountDisk /dev/diskX
Write the ISO to USB:
sudo dd if=/path/to/lubuntu.iso of=/dev/rdiskX bs=4m
sync
Eject the USB drive:
diskutil eject /dev/diskX
Booting Lubuntu from USB
To boot from the Lubuntu USB drive:
- Insert the USB drive
- Power on the computer
- Enter BIOS or UEFI Boot Menu
- Select the USB device
Lubuntu will start in Live mode. If persistence is enabled, your changes will be saved across reboots.
Install Lubuntu from USB
While running Lubuntu from USB, you can install it permanently to a hard drive by clicking Install Lubuntu on the desktop and following the installer prompts.
Lubuntu Bootable USB FAQ
Can I create a Lubuntu bootable USB on macOS?
Yes. macOS users can use Balena Etcher or the dd command to create a Lubuntu Live USB.
Does Lubuntu support persistence?
Yes. Persistence allows you to save changes when running Lubuntu from USB. Tools like YUMI make this easy on Windows.
What USB size is recommended?
At least 4 GB for basic use. For persistence, 8 GB or larger is recommended.
Can I install Lubuntu to my hard drive from USB?
Yes. Boot into Lubuntu Live and select the Install Lubuntu option.
Final Thoughts
Creating a Lubuntu bootable USB is one of the best ways to revive older hardware or carry a fast, portable Linux system with you. Whether you use Windows or macOS, modern tools make the process straightforward and reliable.
With persistence enabled, a Lubuntu Live USB becomes a powerful, reusable operating environment that fits in your pocket.
Similar process can be applied to other Ubuntu family based derivatives to create for example an Kubuntu bootable USB drive.