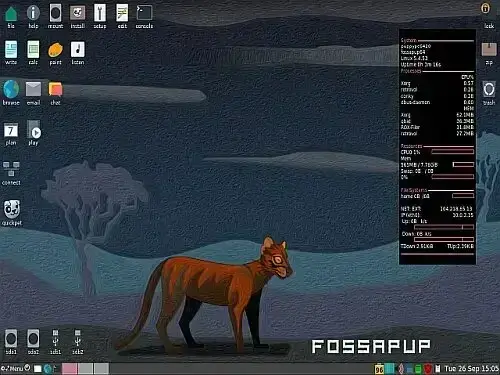
Create a Puppy Linux Live USB from Windows. In the following section I show you one way to install and run a Live Puppy Linux from a bootable USB flash drive using the Universal USB Installer (UUI). Although cram packed with popular features, this Live Linux distribution aims to remain lightweight and small, allowing it to run very well on older computer hardware.
Puppy Linux Running from USB

Puppy Linux Bootable USB Features
Puppy Linux is a popular lightweight, open source distribution that was designed to be fast, efficient, and easy to use. It was originally created by Barry Kauler in 2003 and has since gained a dedicated user base spawning many different spinoffs due to its unique characteristics and versatility. Key features of this Linux distribution include:
- Is a Lightweight Linux Distro: Known for its small footprint and low system resource requirements. It can be run on older hardware with limited RAM and storage space, making it an excellent choice for reviving older computers or running on systems with minimal resources.
- It's a Live Linux Distribution: Puppy Linux is distributed as a bootable ISO image. This means you can boot your computer directly from the ISO without needing to install it on your hard drive. This feature makes it handy for using Linux while on the go.
- Persistence Feature: Some versions support persistence, allowing you to save some of your settings, files, and configurations while running from USB.
- User Friendly GUI - GDE: This Live distribution aims to be user friendly and accessible to users of all skill levels. Most builds use an intuitive and easy to learn graphical desktop environment such as JWM or IceWM.
- Simple Package Management: It uses its own package management system called "PET packages" or "Puppy Package Manager." While it has its package format, it is also cross compatible with Debian (.deb) and Slackware (.tgz) packages, increasing its software availability.
- Build your Own Puppy: The distribution is also is highly customizable. You can create your own Puppy variants, known as "Puppy builds" or "Puppy derivatives," tailored to your specific needs. This makes it a popular choice for embedded systems and specialized use cases.
- Puplets: Puppy Linux comes in various "puplets" or customized versions tailored for different purposes, such as Puppy Arcade for gaming, Puppy Slacko based on Slackware, and many more. These puplets often come with specific software and configurations to suit their intended use cases.
Overall, booting from a Puppy Linux USB is great for users who want a lightweight, portable, and customizable Linux distribution that will run on older hardware.
Puppy Linux Detailed Specifications
- Distribution Home Page: Puppy Linux Project
- Developer: Barry Kauler
- Original Release Date: First released in 2003<
- Is a Main Distribution: Yes (there are many spinoffs and remixes based on it)
- Persistent Feature: Yes
Basic Essentials to create a USB Puppy
- Windows 11, 10, 8, 7 PC (or Linux running WINE)
- *puppy*.iso file
- USB flash drive (use a fast SSD thumb drive to achieve the best performance)
- Universal USB Installer (USB Boot Maker) or dd.exe
How to Create a Puppy Linux Live USB using UUI
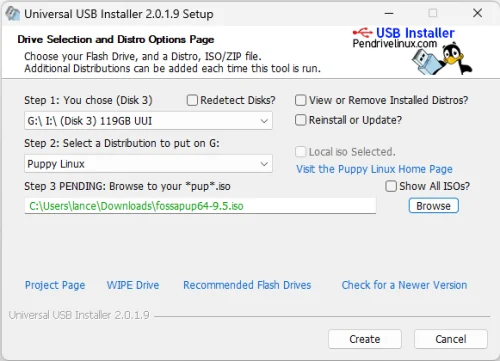
- Download and run the Universal USB Boot Maker.
- (1) Select your USB drive from the drop list.
(2) Next, choose "Puppy Linux" for the distribution.
(3) Browse to your *pup* ISO and then click Create.

Make a USB Bootable Puppy Linux using DD
You can use the following steps to create a USB bootable Puppy drive using dd on Windows:
Note: Exercise caution when using dd as it will destroy all data on the select drive. Double check to ensure you are writing to the correct USB drive, before running the dd command.
- First, download a Puppy ISO file from the official website. Make sure you download the correct version (32-bit or 64-bit) for your system.
- Plug in or insert a USB drive into your computer. Make sure it's large enough to hold the ISO.
- Next, we will use diskpart to identify the device name assigned to your USB drive in Windows, open a Command Prompt with administrative privileges (right click and select "Run as administrator") and then type the following:
diskpart - Then, to list all disks attached to the system:
list diskIdentify the number corresponding to your USB drive. It's also a good idea to confirm using at least one other method such as file explorer or the disk management tool (diskmgmt.msc) that the drive is correct, before proceeding.
- Before using dd, we will use the diskpart utility to clean and unmount it:
Replacing X with the number corresponding to your USB drive, type the following:select disk X - Then type the following command to clean and unmount the drive:
clean - Download dd for Windows and start the program.
- Write your Puppy ISO to a USB drive using dd by typing:
dd.exe if=path\to\*pup*.iso of=\\.\PhysicalDriveX bs=4M- if=path\to\*pup*.iso: This is the path to the ISO file on your computer. Edit the path and *filename* to fit your scenario.
- of=\\.\PhysicalDriveX: Replace X with the number of your USB drive, as determined in step 3.
- bs=4M: This sets the block size to 4MB. You can adjust this value higher to speed things up, if needed.
- The dd command will take some time to write the ISO to a USB drive. Be patient and wait for it to finish.
- Once the process is complete, safely eject the USB drive from your Windows computer.
Booting from USB Puppy Linux
- During startup, at the system POST (Power On Self Test) screen, using your motherboard hotkey, enter BIOS setup
- Next, use the up/down arrow keys to set the first boot device to your USB drive.
- Save your changes (F10), and allow the system to reboot from the flash drive.
If all went well, you should be booting from your UUI created Puppy Linux bootable USB with a menu option to boot your Puppy Linux USB. Depending on the version, you might be prompted to create a persistent file for saving your session data on shutdown. Just be sure to choose your flash drive when prompted.
Note: You should also now be able to use your Puppy Linux Live USB to install the portable operating system to a local hard drive, if you want.


