
Easily create a bootable GParted Live USB flash drive from Windows using YUMI, or using dd in Linux or on macOS. GParted, a popular graphical partition editor developed by Curtis Gedak, is a powerful open source USB partition tool for managing disk partitions. It allows you to create, resize, delete, and reorganize partitions with ease. Additional features include managing boot flags, formatting drives, cloning partitions, and more.
GParted Live Running on a USB Flash Drive

- Official Website: Project Home Page
- Author: Curtis Gedak
- Persistence: Not needed
About GParted
GParted (GNOME Partition Editor) is an intuitive, open-source tool widely used to graphically manage disk partitions. It supports many file systems such as NTFS, FAT16/32, ext2/3/4, HFS/HFS+, Linux swap, ReiserFS, UFS, XFS, and more. The program can detect RAID devices as well.
Designed for use by both beginners and advanced users, GParted offers an easy to navigate and use interface. It is often bundled with Linux distributions but can also be downloaded as a standalone ISO for use on bootable USB drives.
Key Features
This versatile partitioning tool enables you to:
- Create new partitions on your disks.
- Resize existing partitions without data loss.
- Delete unwanted partitions safely.
- Move partitions to reorganize disk layout.
- Format partitions in multiple file system types.
- Enable or disable boot flags on partitions.
- Clone partitions for backups or migration.
What You'll Need
- A Windows, Linux, or macOS system
- A fast USB flash drive
- The GParted Live ISO file
- YUMI Multiboot USB Creator (for Windows) or the dd command (Linux/macOS)
Creating a GParted Live USB from Windows
Follow these steps to create your bootable USB on Windows:
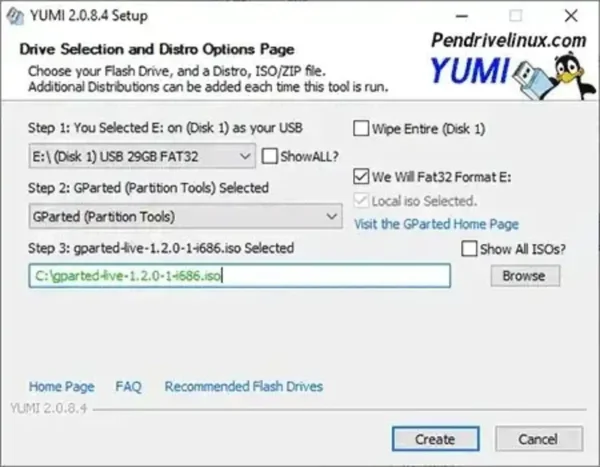
- Download and launch YUMI.
- Select your USB flash drive.
- Choose GParted (Partition Tools) from the list.
- Browse to and select your GParted ISO file, then click Create.
- Restart your PC and enter the BIOS or Boot Menu. Set the USB drive as the first boot device and reboot.
Note: You can run YUMI from Linux using WINE. If "GParted" isn't listed in YUMI's distribution dropdown, select "Try unlisted ISO" and manually choose the ISO.
Creating a Bootable GParted USB on Linux
Warning: The following dd method will erase your USB drive completely. Double-check that you've backed up any important data.
- Insert your USB drive.
- Download the GParted Live ISO and save it to your Desktop.
- Open a terminal (Ctrl + Alt + T).
- Identify your USB device by running:
sudo fdisk -l
Note the device name (e.g.,
/dev/sdX). - Change to the Desktop directory:
cd Desktop
- Write the ISO to the USB (replace
Xwith your device letter):sudo dd if=gparted-live*.iso of=/dev/sdX status=progress
- Reboot, enter your BIOS or Boot Menu, and boot from the USB drive.
Creating a Bootable GParted USB on macOS
- Insert your USB drive.
- Download the GParted Live ISO.
- Open Terminal.
- Identify your USB device:
diskutil list
- Unmount the USB drive (replace
Xwith your device number):diskutil unmountDisk /dev/diskX
- Write the ISO to the USB (replace
Xaccordingly):sudo dd if=/path/to/gparted-live.iso of=/dev/rdiskX bs=1m
- Eject the USB:
diskutil eject /dev/diskX
- Reboot and hold the Option key to select the USB as your boot device.
Frequently Asked Questions
What is GParted bootable USB used for?
It's a free, open source USB partition editor that lets you create, resize, move, or delete disk partitions safely and efficiently.
Which file systems does GParted support?
GParted works with NTFS, FAT16/32, ext2/3/4, HFS/HFS+, Linux swap, ReiserFS, UFS, XFS, and many others.
How can I verify the correct USB drive before proceeding?
Use fdisk -l (Linux) or check carefully in YUMI (Windows) to confirm the device name to avoid data loss.
Can I use persistence with GParted on USB?
Persistence is generally unnecessary because GParted is primarily a live partitioning tool.
Troubleshooting Tips
My system doesn't boot from the GParted USB.
- Make sure your BIOS/UEFI is set to boot from USB first.
- Verify that your system supports USB booting (especially with legacy BIOS).
- Try different USB ports or another USB stick.
GParted isn't listed in YUMI's dropdown.
- Use the "Try unlisted ISO" option and select the ISO manually.
- Confirm your ISO file is correct and uncorrupted.
The dd command hangs or is slow.
- Confirm the correct device letter is used.
- Check the ISO integrity.
- Use a faster USB port (USB 3.0+) or a different USB drive.
USB drive unreadable after writing the ISO.
- This is normal with dd since it overwrites the USB.
- You can reformat the drive afterward for regular use.
I can't find the downloaded ISO.
- Check your downloads folder or search your system.
- Ensure you downloaded the correct ISO file.
GParted Live USB doesn't detect my hard drive or partitions.
- Make sure the drive is connected properly and recognized by BIOS/UEFI.
- Check for RAID or special setups; verify compatibility on the official site.
- Update to the latest GParted version if hardware is new.
Final Thoughts on This USB Partition Tool
GParted remains one of the most reliable and efficient partitioning tools available today. Its ability to run from a bootable USB drive without requiring installation makes it incredibly portable and versatile. Whether you're resizing partitions, managing boot flags, or preparing drives for multi or dual boot setups, this USB bootable partition tool delivers the functionality and flexibility professionals and DIY users need.
Thanks to its open source nature, broad file system support, and intuitive interface, it continues to be the go-to solution for safe and effective disk management. If you frequently work with storage devices, having a GParted Live USB in your toolkit is a must.
