
Want to boot Windows 11 from USB without installing it to your internal hard drive? This complete step by step guide shows you how to create a fully portable Windows 11 bootable USB using a VHDx virtual hard disk image. It'll also work with windows 10.
Unlike a standard Windows 11 installer USB, this method allows you to run Windows 11 directly from a USB drive. The operating system runs entirely from portable media, giving you a modern Windows To Go alternative that can bypass strict hardware requirements while keeping your internal disks untouched.
Create a USB Bootable Windows 10 or 11


For this process, we use YUMI exFAT as our Windows media creation tool. You can also use Universal USB Installer (UUI) if you prefer another approach to creating a Windows 11 bootable USB.
Windows 11 USB Installer vs Portable Mode
When people want to boot Windows 11 from USB, they usually mean one of two completely different methods. Understanding the difference is critical.

1. Create a Windows 11 Installer USB
- Used to install Windows 11 onto an internal SSD or hard drive.
- Windows does not run from the USB drive itself.
- For permanent (re) installations to an internal hard drive.
If you only need an installer drive, follow Microsoft’s official Windows 11 installation guide.
2. Run Windows 11 Directly from USB (Portable Windows 11)
- The entire operating system runs from the USB device.
- Windows is installed inside a dynamically expanding .vhdx file.
- No internal installation required.
- Works as a Windows To Go replacement.
This tutorial focuses on method two: creating a portable Windows 11 USB drive using a VHDx image.
Why Official Microsoft Windows 11 ISOs Will Not Work
Standard Windows 11 ISO files downloaded directly from Microsoft are designed strictly for internal disk installations.
The Windows installer includes built in hardware detection and enforcement mechanisms that:
- Require installation to a fixed internal drive
- Enforce TPM 2.0, Secure Boot, CPU, and RAM checks
- Block installation to removable USB media
- Trigger unsupported hardware errors during setup
If you attempt to install Windows 11 into a VHDx file stored on a USB drive using the official ISO, the installer typically refuses to proceed because it detects the target as removable storage.
Why Modified Windows 11 Builds Work for USB Boot
Custom builds such as Phoenix LiteOS and Windows X-Lite include configuration adjustments that:
- Disable TPM and Secure Boot enforcement
- Remove internal disk only installation restrictions
- Adjust hardware detection routines
- Improve performance when running Windows 11 from USB
These modifications allow Windows 11 to successfully install and operate from a VHDx image stored on an NTFS formatted USB flash drive.

Why Use a VHDx for a Windows 11 Bootable USB?
- Run Windows 11 portably on multiple PCs.
- Keep the entire OS inside one VHDx file for easy backup.
- Bypass TPM and hardware restrictions.
- Turn your USB into a multiboot toolkit using YUMI.
- Still use the drive for regular storage.
How to Create a Portable Windows 11 Bootable USB

- Download YUMI exFAT and launch it.
- Select your USB drive and prepare it using NTFS.
- Choose Phoenix LiteOS or Windows X-Lite.
- Browse to the ISO file.
- Adjust the VHDx file size if needed.
- Click Create to build your Windows 11 bootable USB.
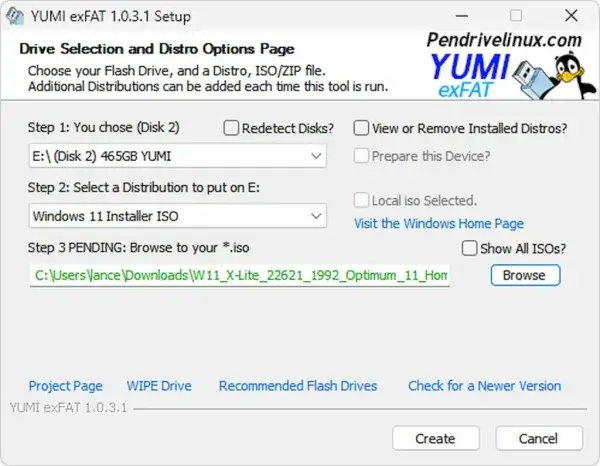
Using YUMI to create a Windows 11 portable USB
How to Boot Windows 11 from USB
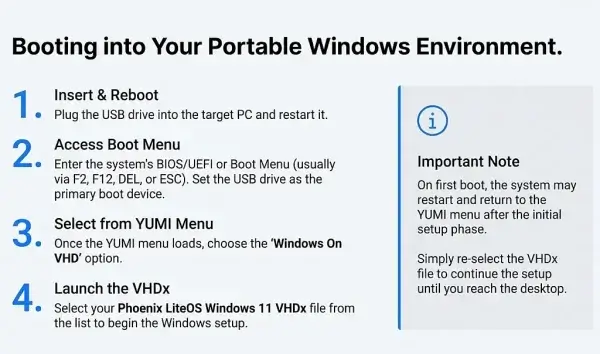
- Reboot and access your BIOS or UEFI.
- Set the USB drive as the primary boot device.
- Select Windows On VHD from the YUMI menu.
- Choose your Windows 11 VHDx file and proceed to boot.

YUMI Multiboot USB Capabilities
Beyond letting you boot and run Windows from USB, YUMI supports adding Linux distributions, rescue environments, and other tools to the same drive. This makes it ideal for building a complete multiboot USB toolkit you can bring with you to boot anywhere.
Alternative: Add Hiren's Boot PE to Your Multiboot USB
You can add Hiren's Boot PE to the same USB drive, creating a complete recovery and portable OS toolkit on a single device.
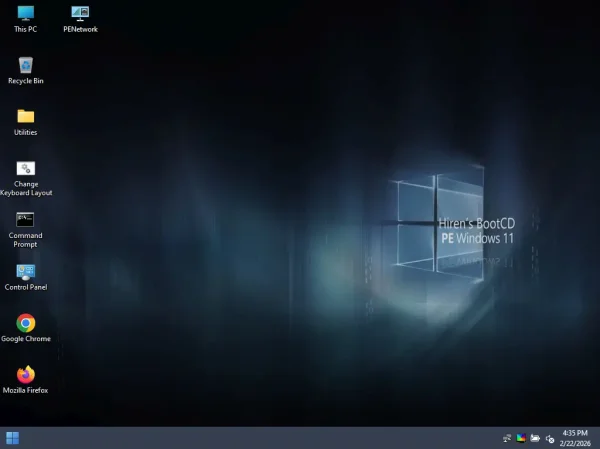
Hiren's Boot PE is a lightweight Windows preinstallation environment that includes essential system recovery, disk management, password reset, imaging, and diagnostic tools. It loads quickly and is ideal for repairing or troubleshooting Windows systems.
Download the latest version here: Hiren's Boot PE. Optionally, you can use an older BootCD release: 15.2 build with a mini Windows XP. Note that the older build will only boot via legacy BIOS as it does not support UEFI systems (however, most modern systems are backwards compatible).
How to Add Hiren's Boot PE Using YUMI
- Download the Hiren's Boot PE ISO.
- Launch YUMI and select your USB drive.
- Choose Hiren's Boot PE from the distribution list.
- Browse to the ISO file.
- Click Create and wait for completion.
After installation, it will will appear in your YUMI boot menu for easy selection.
Tools Included in Hiren's Boot PE
- Disk cloning and imaging utilities
- Partition managers
- Password reset tools
- File recovery software
- Hardware diagnostics
- Antivirus and malware scanners
Adding Hiren's BootCD 15.2 (Mini Windows XP)
The older Hiren's BootCD 15.2 includes a Mini Windows XP environment. It boots only via BIOS. To add it:
- Download the 15.2 BootCD ZIP from the official archive.
- Extract the ISO file from the zip.
- Launch YUMI.
- Select Try Unlisted ISO/IMG.
- Browse to the extracted ISO.
- Click Create to add it to your USB.
Why Combine Portable Windows 11 and Hiren's Boot PE?
- A full portable Windows 11 operating system
- A fast Windows PE recovery environment
- Offline repair and recovery tools
- Disk imaging and cloning utilities
- Password and registry repair functionality
By combining these, your USB drive becomes a powerful multiboot recovery and portable workstation solution.
Frequently Asked Questions
Can I boot Windows 11 directly from a USB drive?
Yes. Using a VHDx image and a modified Windows 11 build (such as Phoenix LiteOS), you can run Windows 11 entirely from a USB flash drive without installing it to the internal storage.
Do I need a TPM or Secure Boot to run Windows 11 from USB?
No. Modified Windows 11 Lite builds specifically remove TPM, Secure Boot, and CPU checks, allowing the system to run on most hardware that supports USB booting.
What is Hiren's Boot PE?
Hiren's Boot PE is a lightweight Windows preinstallation environment (PE) designed for recovery, diagnostics, disk cloning, and troubleshooting. It can be added to a multiboot USB alongside a portable Windows 11 installation or stand alone.
Where can I download Hiren's Boot PE or older builds?
You can download the latest Hiren's Boot PE here: Hiren's Boot PE. For the legacy Hiren's 15.2 Mini Windows XP build, use this link (Legacy BIOS only, no UEFI support).
How do I add Hiren's to my multiboot USB?
Use YUMI to select your USB drive, then choose Hiren's Boot PE from the distribution list. Browse to the downloaded ISO file and click Create. For the older 15.2 build, use the "Try Unlisted ISO/IMG" option in YUMI.
Can I dual boot Windows 11 and Linux from the same USB drive?
Yes. Using YUMI, you can create a multiboot USB with Windows 11 VHDx, Hiren's Boot PE, and multiple Linux distributions, turning your USB into a portable toolkit for testing, recovery, or troubleshooting.
What USB drive is best for running Windows 11 from USB?
Use a USB 3.1/3.2 flash drive with at least 128GB capacity, or an external SSD for the best performance. USB 2.0 drives will work but may be significantly slower.
Can I update Windows 11 while running from USB?
Possibly, but updates may slow performance and increase the VHDx file size. It is recommended to perform manual updates to control the size and performance impact.
Disclaimer
Note: This guide and the portable Windows 11 VHDx setup are provided for educational purposes and experimentation. It's all in good fun. We do not recommend using a portable Windows environment as a primary or production system. Use it for testing, troubleshooting, or learning, and as usual, always keep backups of important data.
Final Thoughts on Booting Windows 11 from USB
Creating a Windows 11 bootable USB using a VHDx image gives you true portability without touching or modifying internal drives. This setup is ideal for testing software, troubleshooting systems, running diagnostics, or building a powerful multiboot USB toolkit. With a portable Windows you can carry a complete operating system in your pocket and boot it on nearly any modern PC that supports USB booting.
Pairing it with tools like Hiren's Boot PE or the older 15.2 BootCD with Mini XP build lets you create a full Windows recovery and diagnostic environment with you as well. With YUMI, you can combine multiple operating systems, Linux distributions, and system utilities on a single USB flash drive, turning it into a flexible, all in one multi-boot toolkit.
Remember, this portable Windows setup is meant for experimentation and convenience and we do not recommend relying on it as your main production system. For everyday computing, you should continue using a standard installed Windows environment.
To expand your skills and your USB toolkit even further, explore our Make Bootable USB Drives section, where you’ll find guides on multiboot Linux, rescue tools, and more ways to turn a simple USB drive into a portable workstation.
With this approach, you gain:
- Complete portability of Windows 11 without modifying internal drives
- Ability to test software or troubleshoot multiple PCs safely
- Integration with Hiren's Boot PE or other diagnostic tools
- Multiboot capabilities with Linux and other OSes
- A single USB drive serving as both operating system and utility toolkit
This method combines practicality, flexibility, and a bit of fun; giving you a modern Windows To Go alternative that’s more versatile than most standard installations.