
BIOS USB Booting and UEFI Boot Menu options: Learn how to boot from a USB drive on any PC using BIOS or UEFI. Whether you're trying to install Windows, run a Live Linux system, or launch recovery tools, this simple tutorial covers everything you need to get a bootable USB working.
BIOS and UEFI USB Booting (Boot Menu)
 - USB Booting")
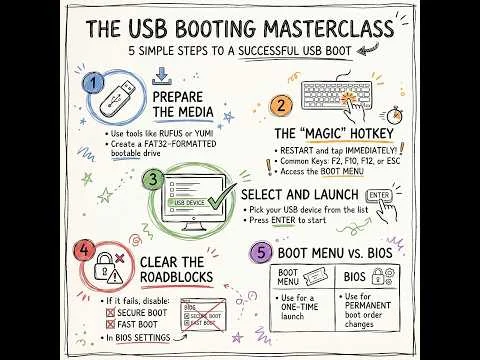
Quick summary: Create a bootable USB, enter BIOS or the boot menu, select your USB drive, and boot. If it fails, adjust Secure Boot, boot order, or USB compatibility settings.
What You Need Before Booting from USB
- A properly setup bootable USB flash drive
- A compatible ISO (Linux, Windows installer, system tool or utility)
- A computer that supports USB booting (most modern PCs do)
To create a bootable USB, we recommend using one of the following tools:
Tip: For best compatibility, use FAT32 or include a small FAT32 boot partition. UEFI systems require FAT32 for native booting, while BIOS systems can boot from a wider range of filesystems depending on the bootloader used.
BIOS vs UEFI (Why It Matters)

- BIOS: Older firmware used on legacy systems
- UEFI: Modern firmware with Secure Boot and faster startup
Tip: Most newer systems use UEFI, which may require:
- A FAT32 EFI boot partition (required for native UEFI boot support)
- Secure Boot: May need to be disabled for some Linux distributions or unsigned tools. Many modern distributions support Secure Boot and will work without disabling it.
Note: Legacy BIOS systems do not require FAT32 specifically. They load boot code from the device, and the filesystem (FAT32, NTFS, etc.) is handled by the bootloader. In contrast, UEFI firmware reads files directly and expects a FAT32 formatted EFI System Partition.
FAT32 has a 4GB file size limit. If your ISO is larger than 4GB (common with Windows installers), you'll want a tool that automatically splits the file or use a dual partition setup (FAT32 + exFAT/NTFS) to maintain UEFI compatibility.
Many modern Linux ISOs are hybrid images that support both BIOS and UEFI booting automatically when written correctly to a USB drive.
Advanced: Some tools such as YUMI exFAT and Rufus can boot from NTFS or exFAT by using a small FAT32 partition that chainloads a secondary bootloader (for example, boots FAT32 → loads driver → accesses NTFS/exFAT partition). This allows large ISO files to be used while maintaining UEFI compatibility.
👉 For detailed differences and firmware basics, see: How to Enter BIOS and Boot Menu
How to Boot from a USB drive (Boot Menu or BIOS)

- Insert your USB drive into the computer
- Restart or power on the system
- Enter Boot Menu or BIOS (F2, F10, F12, ESC, or DEL)
- Select your USB device from the list
- Press Enter to boot
How to Tell if You Booted in UEFI or BIOS Mode
- Windows: Press
Win + R, typemsinfo32, and check "BIOS Mode" - Linux: If
/sys/firmware/efiexists, you booted in UEFI mode
If your PC boots into Windows instead, your USB was skipped. In which case, you can try the fixes below.
Quick Fixes if USB Won’t Boot
- Disable Secure Boot
- Turn off Fast Boot
- Set USB as first boot device
- Try a different USB port (use rear ports on desktops)
- Remove other USB devices
- Try a USB 2.0 port on older systems (some legacy BIOS systems cannot boot from USB 3.0 ports)
Common USB Boot Problems (and Fixes)
USB not showing in boot menu
- Reinsert the drive and reboot
- Try another port
- Make sure the USB is actually bootable
- If your USB does not appear as a UEFI option, it may be missing a valid EFI bootloader or FAT32 EFI partition
No bootable device found
- Recreate the USB using a different tool
- Check MBR vs GPT compatibility (Legacy BIOS typically uses MBR, while UEFI systems use GPT)
Why USB Appears Twice in the Boot Menu
- You may see your USB listed twice, once as UEFI and once as Legacy
- Choose the entry that matches how your USB was created (UEFI or Legacy)
System skips USB and loads Windows
- Use the one time boot menu to set BIOS/UEFI boot order
- Disable Fast Boot
UEFI vs Legacy Boot Mode mismatch
- If your USB was created for UEFI but your system is set to Legacy (or vice versa), it may not boot
- Enter BIOS/UEFI settings and try switching between UEFI and Legacy/CSM modes
- Alternatively, recreate the USB to support both modes using a tool like YUMI exFAT
This solves a good percentage of "USB won't boot" cases.
Boot Menu vs BIOS (Important Difference)
Boot Menu: Temporary selection (best option)
BIOS Settings: Permanent boot order changes
Use the boot menu if you only want to boot from a USB drive once.
Full guide with hotkeys: BIOS Hotkeys and Boot Menu Keys
Advanced & Legacy USB Booting (Older PCs)
Older systems may use special USB boot modes:
- USB-HDD (recommended)
- USB-ZIP (legacy fallback)
- USB-FDD (rarely works)
See full legacy guide: USB BIOS Boot Settings and Options
Using older Award BIOS systems: Phoenix/Award BIOS USB Boot Guide
Best Way to Create a Bootable USB
If you're just getting started, we recommend:
- YUMI exFAT for multiboot USB drives
- Etcher or Rufus for simple single ISO setups
Browse all tools: Bootable USB Creators
Frequently Asked Questions
Why won't my computer boot from USB?
Most commonly: Secure Boot enabled, Fast Boot enabled, or the USB was not created properly.
What format should a bootable USB use?
FAT32 is required for native UEFI booting. NTFS or exFAT may work when a compatible bootloader is used, but are not universally supported by firmware.
Do I need to change BIOS settings every time?
No. You can use the boot menu to select USB without changing permanent settings.
Can I run multiple operating systems from one USB?
Yes. Tools like YUMI allow multiboot USB setups with multiple ISOs.
Final Take on UEFI and BIOS USB Booting
Booting from USB is one of the most powerful tools for installing operating systems, running Linux live environments, and repairing systems. Once you understand how BIOS, UEFI, and boot menus work, the process becomes quick and reliable.
If you run into issues, use the troubleshooting guides linked above or try recreating your bootable USB using a different method.